Monday, July 26, 2010

Craftsmen - and what isn't.

When we last left off - the plasters had left their mark. (In more ways than one). And while we were waiting for the siding to arrive, there was the little issue of how to frame the exterior windows.


Our particular style of house is influenced by the Craftsmen style. What is Craftsman? Well here is an excerpt from a Glendale website;

CRAFTSMAN STYLE
(c.1900-c.1930)

The Craftsman Style was the dominant style for smaller houses built throughout the country during the period from about 1905 until the early 1920s. It originated in southern California and most landmark examples are concentrated there. Like vernacular examples of the contemporaneous Prairie style, it quickly spread throughout the country through pattern books and popular magazines. The style rapidly faded from favor after the mid-1920s; few were built after 1930.

Craftsman houses were inspired primarily by the work of two California brothers – Charles Sumner Greene and Henry Mather Greene – who practiced together in Pasadena from 1893 to 1914. From about 1903 they began to design simple Craftsman-type bungalows; by 1909 they had designed and executed several exceptional landmark examples that have been called the “ultimate bungalows.” Several influences – the English Arts and Crafts movement, an interest in oriental wooden architecture, and their early training in the manual arts – appear to have led the Greenes to design and build these intricately detailed buildings. As a result, a flood of pattern books appeared, offering plans for Craftsman bungalows; some even offered completely pre-cut packages of lumber and detailing to be assembled by local labor.

Through these pre-cut examples, the one-story Craftsman house quickly became the most popular and fashionable smaller house in the country. High-style interpretations are rare,except in California where the have been called the Western Stick style.

Typically a one- to two-story building with a low-pitched, gabled roof (occasionally hipped) with wide,
unenclosed eave overhang; roof rafters usually exposed; decorative (false) beams or braces commonly added under gables; full- or partial-width porches with roof supported by tapered square columns; columns and/or pedestals frequently extend to ground level (without a break at level of porch floor).

Character Defining Features of a Craftsman:
 􀂃 Low-Pitched Gabled (or sometimes Hipped Roof)
 􀂃 Wide, Unenclosed Eave Overhang
 􀂃 Timber Framed
 􀂃 Triangular Knee Brace Supports
 􀂃 Wood Shingle Siding and/or Wood Horizontal Siding and/or Cut Stone Cladding
 􀂃 Wide Window and Door Casings
 􀂃 Tapered Porch Supports
 􀂃 Low Porch Pedestals usually Supporting Columns
 􀂃 Exposed Rafters
 􀂃 Decorative (False) Beams or Braces under Gables
 􀂃 Shed, Gabled or Eyebrow Dormers
 􀂃 Porches, either Full- or Partial-Width
 􀂃 Sloping (Battered) Foundation


Not exactly today's prices....

So the trick today is to somehow keep the Craftsman look of the house without costing us the next generation. One particular feature was the look of the windows. The vast majority of new construction employs modern style or cost-cutting features. A lot of Southern CA is stucco with thin metal windows. But that would utterly destroy the feel of the house we so fell in love with when we bought it.  Even though we upgraded to high efficiency windows to replace the old ones - we were careful to keep the classic grids feel.  Even  modern windows needed an touch of art.


Old Windows


So unfortunately we started out with the picture frame style framing around every window of the house - but had to make the difficult decision to replace them. And it meant tearing out all that work and starting from scratch.

This is not craftsmen - this is how you might frame a oil painting.


"Huh??"

This is a craftsman style window - yes much more work, but in the long run - has far more character.


Bad....


Good!
(Not quite finished though)


Now that's a window!

It was a major set-back and not a easy choice to make - but there was no way we could have lived with the windows in any other style. Plus it has dictated how the interior trim will be handled as well.  So as the case in any construction - there will be up and downs. Not unlike the game of "Chutes and Ladders"

Sunday, July 11, 2010

Getting Plastered!

Things have been happening inside the house - messy things.
All the new construction, and existing, walls are getting buttoned up with drywall. 
(And not with the toxic nuclear Chinese stuff either!)


FYI: Drywall has 2 phases - and both are equally fun.

1) Rough Drywall - cutting board after board of drywall and anchoring it to the studs. Could be nailed or endless mind numbing drilling of countless drywall fasteners. Not to mention - you need to cut and account for every little detail or crevice. Got light fixtures? Outlets? Fashionable protruding fire sprinklers?
You need to cut holes for all of them!


Bathrooms in progress..


The Office taking shape.


The Jacuzzi was looking tempting, until we had to pull it and
drywall the bathroom..


2) Finish Drywall.  After all the tedious cutting and screwing the drywall, then it's time to tape and "mud" all the seams. Easy enough huh? Just let it dry - sand to a smooth finish. Not smooth enough - just add some more mud, let dry and sand again. What? You found a blemish? Put the dust mask on again and repeat step #1! A guaranteed recipe that you'll be tasting drywall dust for the next 3 weeks!


Getting "high" in the bedroom.


When will all the
sanding end??


Oh, another tip about drywall dust. It has this Harry Potter property to magical penetrate any slight gap or leak in plastic and seek out the entire house and coat everything to an altitude of about 10,000 feet in an extremely fine grain dust.  Once working in our kitchen, I used a hand grinder to smooth out a plaster corner to better fit an outlet cover.  Why I was only going to grind for a few seconds - why bother with the hassles of hanging plastic? After about a minute of grinding - the kitchen was nearly obscured in dust and we had to wash pretty much every dish in the cabinets until 4am in the morning.

Needless to say - I am a big fan of plastic!

That's a Wrap - (well not by a long-shot!)


After all the fluffy fibers of insulation has settled - the next step was
 to wrap the house in a water-tight barrier in preparation of getting siding.
In this case, the siding and wrap materials were supplied discreetly by a
major home improvement center whom wished to remain anonymous!
(And when I say "Supplied" - it means I have the
distinct honor of paying 100% for it!)


I did mention discreetly didn't I?


Any guesses who the supplier was?
(Hint: It wasn't High..It was,....)


I am also waiting patiently near the
mailbox for any royalty checks from all the
logo and advertising usage.


Another landmark - we have a garage door!
Hurray!

Insulation - In Southern California..Wha??

So when we last left off...


.. the general state of the house was looking not unlike a giant office cork board.
Yet, I'm sure this comes as a complete shock to the fine peoples of the
Midwest and East Coast that we here in California would need to insulate our homes.


It's True!
Well the weather here is unpredictable and varies greatly. In the often harsh LA winters,
temperatures have been known to plummet in the low 30's!! (Yes, I know!)
And in the blistering heat of summers, it is not uncommon for someone to self-combust without warning.

Of course - we are all also aware of the generosity of the power companies who try
their very best to keep electric and gas bills to a modest low.


In reality the old house leaked like a sieve - and the HVAC would run on and off every 1/2 hour or so.
Our hope is by insulating we can keep the bills lower. Plus the city and state are offering
 fantastic rebates and tax incentives on all sort of energy saving devices.
(Windows, appliances, insulation, Xbox 720, etc.)  So now seems the time.


Welcome to the house that the Pink Panther built!


If you haven't noticed by now - I am totally fixated by wide-angle panoramic views.
 Plus it is nearly impossible to convene the scope of the rooms with a normal camera lens.
So I ended purchasing a "Stitcher" program that automatically combines several consecutive shots
into a single wide panorama shot.  Being a PC user, this has become an invaluable tool.
 (Until I found out Mac computer and Kodak digital camera do it automatically!)
It certainly isn't a precise science though, and if you look carefully -
you will sometimes see misalignment's and ghost images.


2 Views of the Office looking as if lined with pink Cotton Candy! (Just don't eat it!)


Looking into the attic space -sans of any HVAC.


The front room looking sweet!


The patio - with one of many bags of insulation awaiting its turn. Can you
believe something so light and fluffy takes 3 guys to carry??
By the the time we are done with all this insulation business, we
better be able to survive a nuclear blast in relative comfort!


Friday, July 2, 2010

The Doors - Live in LA


Okay - cheap gag. But at least they're from Los Angeles.


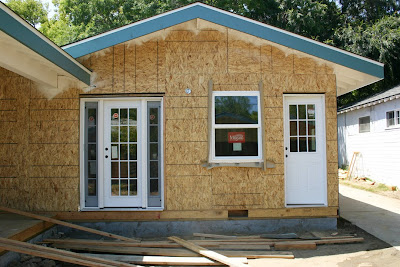
Well since the windows and doors are in -
it's getting alot less drafty inside.


(L-R) Looking at Kid's room and Laundry Room doors.


The Office taking shape. Just watch out for
the first step.....


Close up of the side garage door.
The main garage door is coming soon.


Here is the crown jewel of the house- the front door.
Still unfinished - needs to be stained and sealed yet.


So the plywood central is giving way to the color and hopefully siding soon.
The rough construction is rapidly coming to a finish.

I Can See Clearly Now - the Windows are In!

Like I said earlier - there was a period when it seemed there
wasn't much progress on the house. But now there is an
literal explosion of changes and improvements.


Here is a detail of a worker preparing the original wood frames for the
windows.  Mind you these are the original 2X4 wood that hasn't
 seen the light of day in 90 some years.


Here is the new front picture windows. We had did the best we could
to capture the look of the original design.


Now the driveway side windows have been installed and ready
to be sealed.


Driveway side - back half of the house.


Looking at the side of the Office. 


Here are the original windows off the house. Unfortunately
I couldn't find a resource or place to recycle or
resell these.


Slowly taking shape.